Spade, fork, rake, hoes, trowel, dibber, garden line secateurs, hosepipe and watering can, shears and slasher: What could be simpler?
Clean, dry or lightly oiled, sharp, properly kept, the right ones for the job, your tools are your best laboursaving friends! Dibbers make ideal holes for your planting out, and pushed beside the plant then fill the hole and firm it in nicely.
Storage
Gloves can be hung up to dry with pegs on a short clothes line, boots put upside down on two short stakes or hung through a horizontal ladder. Bow-saws should be hung vertically (release the tension). Spades and forks can be hung vertically from a rack(made from an old pallet) so that they dry; sledge hammers, axes, slashers, bill hooks, pitchforks and hoes (perhaps handle downwards) can join them, or hang on the wall. Lightly oil them and protect the blades.
Small tools like hammers, pliers, secateurs, trowels, hand forks, scoops, onion hoes, weed augurs etc are best oiled and hung up – perhaps in open spring-clips screwed to a batten. It is a matter of space and opportunity. Ropes should be coiled – put a half twist in each hawser loop in the same direction as you are coiling it to prevent kinking up. Hosepipes can be coiled and hung on brackets if they do not come with their own reel.
Sharpening stones: these are fragile – flat stones, cigar and canoe stones are best stored safely in boxes with padding to steady them. Flat stones need a board with end stops to hold them while in use.
Handles: choosing and replacing them
Setting aside the modern development off fibreglass shafts and handles, ash wood is best for light hammers, lump hammers, forks, spades, rakes, shovels and hoes; ash is a traditionally English and relatively elastic wood. American hickory should always be used for axes and sledge hammers if you are renewing the handles: choose one only slightly over-size unless you want a lot of work! A Surform is easiest (the only genuinely new tool invention for 1000 years? Stanley makes inexpensive ones). Or use a rasp, spoke shave or mallet and chisel; and finally sandpaper for a smooth finish: be very careful not to overdo it. Make sure your new handle is smooth; and does not get suddenly thicker where it leaves the socket, as that creates a weak point.
Ropes
Man-made fibre ropes are generally stronger than natural fibres such as hemp and sisal, and do not rot. The strongest is polypropylene (which incidentally floats on ponds), then polyester, and slightly weaker still is nylon. They are either hawser-laid (three strands twisted together) or sheathed, with long straight fibres encased in an outer skin. The man-made polyester sheathed ropes are very strong and do not kink, so are easiest to manage. If you are felling a heavy tree branch do not borrow one from a mountaineering friend to help handle it- sheathed ropes for rock-climbing are designed to stretch.
Wheelbarrows
Barrows normally give years of service (don’t throw heavy rocks in them). Store your barrow dry, turned up, never catching rainwater or condensation. The body is usually sheet steel and so can rust – perhaps paint the outside (Ronseal No Rust smooth black paint?) and oil the inside once a month. The frames are strong; on some barrows the struts for the wheel bearings bend so the wheel catches. You could renew these with angle iron. Also metal patches can be glued or riveted over holes. Don’t over-tighten the bolts holding the wheel bearings, and keep them oiled for easy removal. Wooden barrows, if you have an old one, may be heavy; they need similar care, and also protection from rot and woodworm. But nowadays they are costly handcraft items fetching f360 or more, so give one plenty of TLC if you are the lucky owner.
The wheels of standard metal barrows may be solid; others have thin pneumatic neoprene tyres and these puncture even on small thorns. Fitting a strip of carpet inside the casing may protect the inner tube. Repairs are a nuisance, especially in a struggle with a loaded barrow suddenly turned stubborn as a mule. The advantage of inflatable tyres is said to be easier handling in muddy conditions.
If mud is a real problem (rather than an occasional inconvenience in bad weather), the Dyson ball idea was adapted to cope with mud by ball wheelbarrows, but these are now discontinued. An American “Nubarro” website still exists with apparently false promises, and inactive. Our search for this useful innovation has so far proved fruitless and we would welcome any help.
To increase the carrying capacity of your barrow for light loads you can screw boards to four pieces of 2×2 timber angled out so that they fit neatly inside the barrow at the corners and raise the sides. Remember to lift from bended knees!
Sharpening (NB: modern first-aid kits should include blood protection items)
Sharpening tools requires grinding or filing the metal to a good edge, and finishing off by honing on a sharpening stone, the flat stones have two sides – the smoother one for the final finishing. Use vegetable oil and wipe the stone clean as you work. For sharpening in an allotment hut files, stones, oil and a rag are mostly what you need, and a firm surface to work on. If you have a home workshop then you can use a metalwork vice (protect blades with two pieces of wood when you grip them) and perhaps a low-voltage grinding machine, with safety goggles, gloves and good light.
You need flat files, and half-round files for concave surfaces.
Providing a maintenance service?
Large associations may have an equipment store for mowers, brush-cutters, post drivers, rabbiting spades or large cultivators. If the committee offers sharpening and maintenance services then all the volunteers must have proper training, and the association must follow storage, safety, health, ventilation and lighting regulations beyond the scope of this article, as well as taking out adequate insurance. Training courses are available, or a qualified and experienced member might take over and organise the service in line with current regulations.
Grinding and Honing
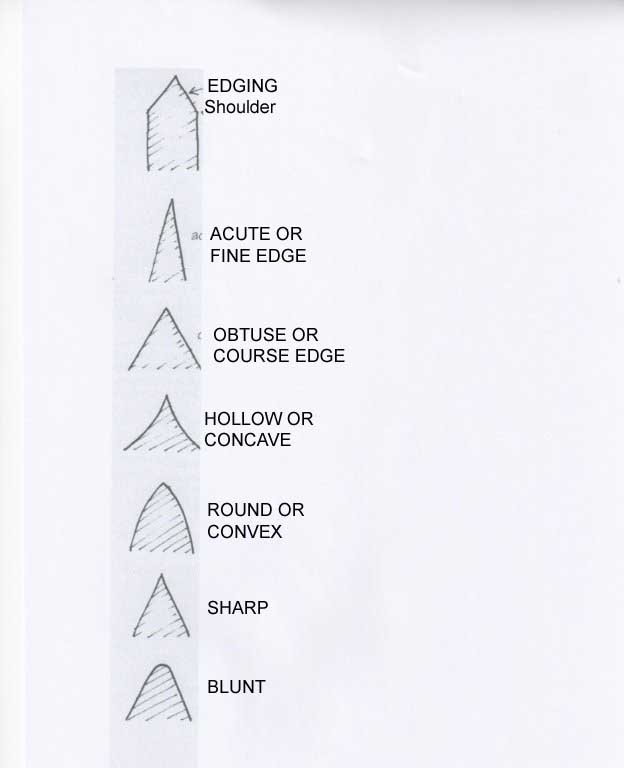
Sharp acute or fine edges cut soft vegetation well, and work best when used with a slicing action (like a knife or scythe). They may crumple when struck so an axe with an acute edge will soon get blunt, and anyway stick in wood without splitting it, Coarse edges (e.g. on axes) are sharp and durable; their angle is wider and they may appear blunt, but still cut your finger.
Workshops: Machines need training for use:
Getting a good edge is first done by grinding
A Clarke 8″ Bench Grinder would probably cost £60 from Machine Mart, require 230 volts, run at 3000 r.p.m. It is sold with eye shields and tool rests, and requires skill to avoid hollow grinding and overheating – which damages the temper of the blade.
A vertical whetstone grinder with a low speed (60 rpm) is an all-round machine and requires less skill – of you can find one. It uses water cooling and so risks causing rust.
Angle grinders are dangerous to operate and can easily overheat the blade.
The Work Sharp Tool Sharpener is aircooled, easier to use, does not require jigs to hold the blades, and has a larger cutting surface that seems to cope with shovels: see www.rutlands.co.uk/ (choose “power tools and accessories,” click on Work Sharp).
A large Association with trained operators and its own tool store could offer these maintenance services for plot holders and the public (at a price), as long as it followed all safety regulations and obtained insurance. Work is then honed with stones.
Allotment Hut: for sharpening use a file
A ten inch coarse mill file (i.e. single cut) with one rounded edge is best for removing metal and giving a smooth finish (rasp-cut files are for soft metals). Second-cut files have criss-cross grooves and are used for roughing – talk to your ironmonger.
Honing
All sharpening requires honing with stones to finish – grasshooks and scythes need honing during use as well.
Sharpening fine edges

Do not rub files backwards and forwards as this blunts them: they cut on the forward stroke; sharpen away from the edge, steady the file end with your leather gloved hand. A file must be sharp – it cuts into the metal, not skids across it. Rub white chalk on it to stop particles accumulating; clean it with a wire brush, or push a wooden wedge along it. Files do wear out, so if yours is on skid row get a new one.
Stones
In use flat stones should be firmly fastened by blocks to a board, and be kept clean – grit will damage the blade. Lubricate them with vegetable oil (not engine oil, wiping off any surplus, finishing with a fine stone. As the blade sharpens you will feel it bite into the stone. If a stone becomes hollow with use, replace it.
Care of Saws
Do Not try to reset and sharpen saws unless you have saw sets and the special sharpening files – and even then tenon saws should not be touched! Send them away to a professional, or replace them. Hacksaw blades (buy flexible ones) need the teeth pointing forwards when you insert them. 24 teeth to the inch is generally best if you are asked.
Bow-saw blades are not woth sharpening anyway: clean and oil them though.
Sharpen an axe with a round stone. The stone has a medium and fine side, so start with the medium one – and grind with a circular motion, less than the width of the stone. Then finish off with the stones fine side. Take care to keep the convex, obtuse edge angle, and not to flatten that out.
Spades
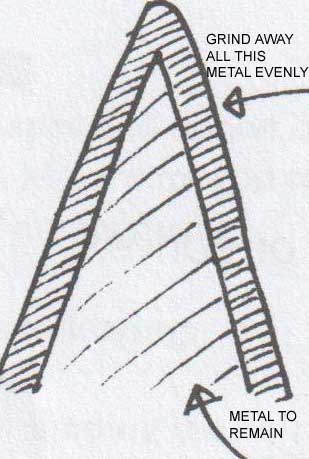
Stony soil will blunt spades, and shovels of course get damaged in normal use. Use a medium-grade file to sharpen along both sides of the blade as evenly as you can, without out putting an acute edge on it.
Digging is important. Try not to bring soil from the bottom of the trench to the surface, and do not use your spade as a lever nor crow-bar, or you will break it at the weld.
- Insert the spade vertically, pushing down with your left foot on the tread.
- Hold the shaft near the bottom with your left hand, tilt it back and lift the spade a little clear of the soil.
- Keep the trench open. Tilt the spade to the right and tip that spit of soil on the far side of the trench. Work across your plot, keeping your trench straight by digging along a string line if necessary. Try to get a swinging rhythm going. If you are left-handed use your right foot and hand.
Border spades (blades roughly 15 x 23 cms or 6 x 9 inches) are useful for heavy clay soil, also for digging holes for planting and for posts. Border spades may not have a tread on the shoulder of the blade, so can be painful to use and ruin wellingtons and shoes by cutting into them. Plastic collars have been made, or you could pay a garage to weld on a small iron bar to thicken the shoulder. Blades are usually roughly 1g x 2g cms (7 x 11 inches). The polished surface of stainless steel blade makes the work easier. If you have a weak back, semi-automatic spades work by leverage rather than lifting.
Hoes
Hoes can be sharpened like spades and shovels, taking care not to give them an acute edge which would quickly bunt. Some modern hoes however are designed to self sharpen by use. Otherwise sharpen both sides of the blade evenly, but do-not produce a fine edge or it will quickly blunt.
There are four main types of hoe:
- Draw hoes. The blade is at right angles to the handle. Use it for clearing heavy weed qrowth making shallow furrows (drills) for seeds, and drawing soil up round leeks and potatoes.
- Dutch hoes. The blade is almost in line with the handle, and is prodded forward to leave the cut weeds to dry in the sun.
- Patent hoes: such as the Wolf self-sharpening push-pull weeder, and the swoe – a triangular stainless-steel adaptation of the draw hoe, with three cutting edges, for hoeing, drilling and weeding.
- Swan-necked or short-handled hoes. These are small draw-hoes (onion hoes) tiring to use unless you kneel.
Mattocks
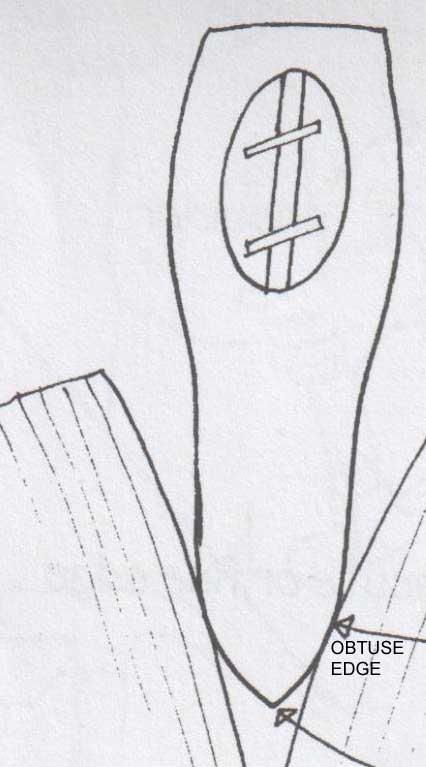
For mattocks sharpen the obtuse-edge blade only on the inside edge.
Sickles
A flat file will remove any snicks in the blade; then use a cigar stone to hone the blade carefully along its entire length, with small circular strokes producing a fine, sharp edge: and sharpen only the upper edge.
In use spend as much time honing as cutting: hold the blade vertically downwards away from you, and sharpen diagonally, stroking away from the edge and honing only the upper edge.
Secateurs and shears
Before sharpening clean them off with a plastic pad and white spirit. For anvil-type secateurs give the cutting blade an acute edge, but sharpen only the outer edge of the by-pass ones. Go from a medium to a fine hand-held flat stone, using a smali circular action. Shears are probably best held in a vice (using wooden blocks to protect the blade). The outer edges only are sharpened, keeping the manufacturers angle; just clean the flat inner surfaces.
Forks
With four round tines (sometimes five) a fork turns soil better than a spade, shifts garden rubbish and compost, and breaks up clods. Smaller forks (border or ladiesforks) are useful where space is restricted and on heavy soil. Flat-tined forks are sold for potato-lifting, if you grow a lot; and manure forks really are handy because they lift farmyard manure without spiking it.
Little maintenance is needed – make sure you never try to lever out obstinate stumps or the fork may break or bend, and once bent the tines are difficult to straighten and awkward to use. Clean, and then oil the shaft with linseed oil. A long-handled fork will spare your back and increase leverage.
The use of stainless steel in forks seems largely cosmetic, because rust doesn’t hinder its use and the ordinary tines are immensely strong. Forks come in a great variety of designs (including long-handled weeding forks) search through Google.
Fitting and maintains handles and shafts
Modem tool shafts may require little maintenance owing to the growing acceptance of fibreglass. Originally designed for industrial tools, fibreglass handles are gaining acceptance for use in tools made for homeowners. They are now designed for a variety of implements including shovels, rakes, hoes, hammers and sledge hammers, pruners, axes, pickaxes and post hole diggers. The advantages claimed for them are: – light weight high impact and corrosion resistance, all-weather durability in damp and harsh conditions, and a colourful aesthetic appeal. With the exception of pickaxe handles, which are available separately, they appear to be moulded into the tool head.
Their elasticity and shock absorbing properties you must test for yourself. Assuming your tools are mostly traditional, then the wooden shafts should be clean and smooth, and can be dressed with linseed oil. Make sure the heads of hammers are tight and properly fitted – a wooden wedge is driven in to a slot in the end, and then two metal wedges added diagonally; for sledgehammers the handle protrudes from the narrow end of the tapered socket in the head (to make sure it does not fly off in use!).
Fitting new shafts probably needs a workshop (and a manual?) and is probably not for the average allotment hut. If the shaft is broken don’t throw the tool on a bonfire to burn it out, this may spoil the metal. Drill out the rivets and then pull out the broken shaft, by sawing off the end and drilling holes, or by inserting and then pulling on a screw. Replacement shafts are often supplied too long – cut off the tapered end and refit, taking care not to put the head back-to-front or upside down. The D or T handle on spades- and forks must be parallel to the blade.
Cultivators and Strimmers
Here maintenance is really a garage job. Make sure you have the correct size socket spanner for changing the spark plugs, and keep a spare. For strimmers you need the correct cutting line or replacement blades as well. You may need engine-oil too. Keep the cultivator’s tines clean and oiled and fitted the right way round. Wear strong boots to protect your feet, as this equipment is often heavy to handle. Many say the Mantis is lightest and handiest, but even without its accessories, (e.g. it can be used as a hedge cutter) does not come cheap. Keep children and unskilled users away.
Fuel
You need a licence from your local authority to store more than 15litres of petrol in any one place, and less than 15 litres is more than enough for the average shed! You must keep it in proper petrol cans, each never larger than 5 litres, and store them preferably in an air-tight box well away from the door or heat; and keep a dry-powder or carbon-dioxide extinguisher handy.
Two-stroke engines: probably it is best to use the manufacturer’s approved oil for mixing with petrol when you are making your two-stroke fuel; and look after the measuring jugs that go with it: experience suggests that mixing the fuel and filling your two-stroke engine should never be left to anyone else, and that you should label the mixes clearly.
Conclusion
We don’t need an expensive collection of tools to grow food and flowers for ourselves and our friends, and beautify this garden that is our country.
Take care to clean, dry and store our tools after use and you save yourself work and expense in the long run.
Gradually build up your stock of tools and look after them: spade, fork, rake, hoes, trowel, dibber, garden line, secateurs, hosepipe and watering can, shears and slasher: what more do we basically need?